I’ve been admiring peter pan collars from afar for quite some time now. I finally decided I’d just make my own. I looked at lots of tutorials, but decided to just wing it and hope it turned out nicely. Well, it worked and I documented the process for you. So here it is, how to add a peter pan collar to a plain crew neck tee or sweater.
If anything is confusing or needs clarification, please ask me about it in the comments. I’d be happy to try and clarify.
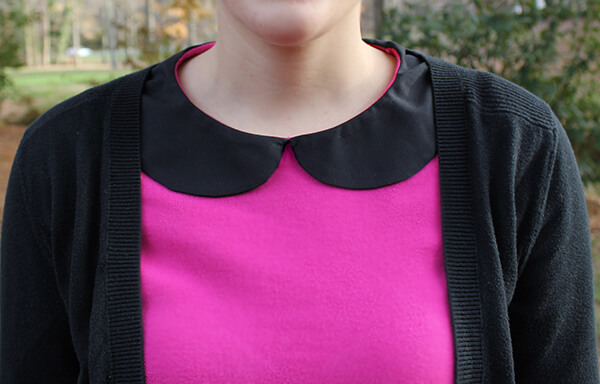
Supplies:
a crewneck tee or sweater. I used an old turtleneck. I just cut off the turtleneck.
1/2 yard of fabric of your choice. This is more than enough fabric, but I like room to mess up. I chose black broadcloth. Broadcloth is cheap and I like the texture/weight.
scissors
tracing paper (or whatever kind of paper you want to use)
tape (optional. See step 1)
pen or pencil
pins
sewing machine (unless you want to hand-sew it all)
white chalk or colored pencil (to mark on fabric with)
iron
Directions:
1. Measure the shape/size of the neck opening on your shirt. I tried several methods before I decided on my strange, unconventional way of doing it. I hung my shirt on a hanger and taped little strips of paper together following the shape of the neckline. I marked the front center and shoulder seams with a pen on my paper strips. I carefully removed the little paper strip necklace I created, and whala, there I had it—the shape of my neck opening. Cut the “paper strip necklace” at each shoulder mark so you’re left with 2 pieces, a front piece and a back piece. If this method sounds completely ridiculous, here, here, and here are three other tutorials I found with different methods of doing this step…none of which worked for me.
2. Lay the outline for the front part of your neckline on a piece of paper. Trace along the top edge and mark the center. Do the same wit the back part of your neckline. You can toss those paper strip creations now.
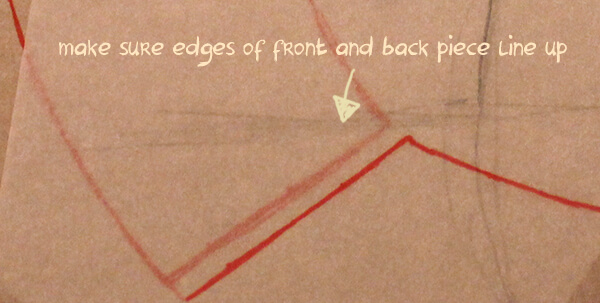
3. Using that top edge you drew in the last step, draw the shape you’d like your collar to be. You only need to draw half the collar for both the front and the back. Make sure the shoulder edges of the front and back pieces are the same width so they’ll line up well. You may want to add a few inches of length to the back piece if you want the collar to meet in the back (see step 12 picture), but I didn’t do this so I can’t give any guidance if you choose to do so. Mine was about 3 inches short of meeting in the back, but I needed it to be that way so the collar would still have some stretch so I could get it over my head.
4. Cut out these two shapes you just drew. Line up the shoulder edges and tape your two shapes together.
5. Take the fabric you’re using for the collar and fold it in half. Lay the shape you made on the fabric with the straight edge lining up with the fold.
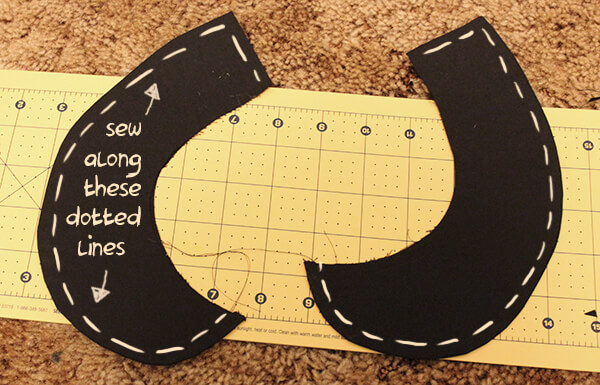
6. Trace the shape with white chalk or whatever medium you choose. Trace about ¼ – ½ an inch larger than your actual shape for seam allowance. In my picture, the dotted line shows the actual shape and the solid line shows seam allowance. The dotted line I just drew to guide me while sewing. You don’t have to do that, but I found it helpful.
7. Cut out your shape. You’ll need two of these. When you unfold them, you should have two big Cs.
8. Lay one C on top of the other and pin them together. If your fabric isn’t the same on both sides, make sure the right sides are together and ugly sides are facing out. Now cut your C in half along the fabric fold. You should have 2 shapes that resemble the paper shape you made earlier.
9. Sewing time! Sew your shapes along the bottom edge of the collar. Don’t sew the edge that follows the neckline of your shirt.
10. Cut little notches along the edges below your stitch (be careful not to cut your stitch) so when you turn it right side out it won’t bunch up and be bulky.
11. Turn your shapes right side out and iron them flat. Woohoo! You’re almost there!
12. Turn your shirt inside out. Pin your two collar pieces to the shirt. Line up the top (unsewed) edges of your collar pieces with the neckline of your shirt and pin in place. I found it was easiest to do this with the shirt on a hanger. BE SURE THE SHIRT IS INSIDE OUT!
13. Sew the collar to the shirt along the neckline.
14. Once the collar is attached, turn the shirt right side out. Fold the collar over and iron it down.
15. Enjoy your lovely restyled shirt! ![]()









4 Comments
Fabulous DIY project. Such a great idea & it turned out really well. I’m going to try one myself only in black velvet & it will be a tie on with a ribbon like this Anthropologie necklace Kendi is wearing with a crew neck sweater.
http://www.bloglovin.com/frame?post=631399939&frame_type=a&blog=3412026&link=aHR0cDovL3d3dy5rZW5kaWV2ZXJ5ZGF5LmNvbS8yMDEyLzExL3RoZS1uZXctY2FzdWFsLmh0bWw
Hope that link works! Thanks for the inspiration. Have a great Thanksgiving & cheers!
That sounds like it will be really pretty! Peter pan collar necklaces are such a great way to add interest to an outfit. I’d love to know how it turns out!
Arg! That link so didn’t work. Try this instead.
http://www.kendieveryday.com/2012/11/poppy-oxblood.html
i love how this turned out. you make it look so easy!